Showing posts with label navigation. Show all posts

Thursday, January 13, 2011

Getting Around Your Facebook Profile Page

This is the third in a series on Social Media.

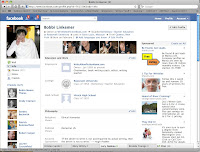
Your Profile Page is personal. Across the top is a search bar that lets you look for people you know. To help you tour your new profile are little arrows that say 1 Bio, 2 Photos, 3 Navigation, 4 Education and Work, and 5 Interests. When you click on an arrow, a small box appears telling you what to do.

Below the arrows are two columns. The left-hand column is topped with your photo, followed by these links:
  • The Wall is where your all of your posts are stored. (Your friends' posts can be seen on their profiles.) When friends want to send you a message they write on your wall.
  • Info is your background—education, work history, philosophy, political leanings—anything you are willing to share.
  • Photos are links to all of your photo albums. When you post photos your friends can see them on your Profile Page.
  • Notes (on my page) are my forwarded blogs.
  • Friends are pictures of all of your Facebook "friends."
  • At the bottom of the column is a link to Add a Badge to your site. There are several categories of badges to choose from. Just click on the one(s) you want.

In the second column, after the word Share, are the following links:

  • Status is the place to bring friends up to date on your life.
  • Photo allows you to share a photo, add a photo, or create an album.
  • Link is a box in which you can direct viewers to another URL.
  • Video tells you to record or upload a video.

On my Profile Page are forwards from my blogs, as well as the most recent photos I have posted. At the bottom of the page are comments from friends who have looked at my profile page.

Wednesday, January 12, 2011

Guide to Creating and Publishing Your New Website

Welcome to guest blogger Bobette Kyle. Bobette draws upon 20+ years of Marketing/Executive and planning positions, business ownership, online marketing experience, and a marketing MBA as inspiration for her writing. She co-owns Lifestyle Inspirations LLC (MY LIFE MATTERS Womens Personal Planner) as well as publishes WebsiteMarketingPlan.com and MyOnlineWeddingHelp.com.

For the uninitiated, the process of starting a Website can be filled with new terminology. Here is a quick vocabulary lesson of some of the used here.

  • Domain Name ("register a domain name"): Sign up and pay for the URL to the homepage of your site.
  • Host/Hosting ("sign up with a host"): This is the company that will have your files on its server and provide the means for people to be able to see your Website. Make sure you pick a good host because you don't want to have to move this later.
  • Nameservers ("link them together using the nameservers"): This is information that tells the domain name services where to find your hosting service’s server.

Note that with some solutions you take care of all three of the above at once. Other solutions require you to handle each separately.

Steps To Getting Started – Overview

During the process of getting your Website started, there are many steps to complete. Many you will be completing simultaneously. Also, please note that if you do not have a Website developer, you would complete all steps on your own.

Initial Administrative Steps
  • Register your domain names.
  • Decide on a Website developer and choose designs or template.
  • Choose a hosting provider, with input from your Website designer, and open account.
  • Change the nameservers on your domain name to point to your host’s nameservers.

Initial Marketing Steps

  • Decide on the purpose of your Website; the way(s) it will help you with your business, book, or service(s); and what kinds of people you want to visit the site (target audience).
  • For better success with Website ranking, complete keyword research so – from the start – you can incorporate those words into the text on your Website.
  • Create Website launch strategies and a marketing plan while site is in development.
  • Begin marketing activities as soon as Website is functional.

Development Steps

  • Settle on site layout and navigational structure.
  • Create or choose images – Website header/logo, photo(s), book cover(s), etc. and send digitally to developer.
  • Write text for each page (incorporating phrases from keyword research) and send to developer.
  • If taking orders online, decide on e-commerce solution (Paypal recommended to start, then upgrade to merchant account after volume increases) and work with developer on details.
  • With developer, decide upon and secure any third party services or software needed to implement marketing programs (For example: newsletter hosting/list management service, blogging software, online audio/mp3 technology, etc.)

Site Finalization and Publication

  • Approve the final Website.
  • Upload the site to your hosting account.
  • Begin marketing activities.